Blog

  • A new book that got my fingers itching for a hook: Crochet Master Class

    Book Cover

    The book is called, Crochet Master Class: Lessons and Projects from Today’s Top Crocheters. It came in the mail last night from the publisher, and I was immediately drawn in. It’s a book you can sit down and read and enjoy, not just flip through looking at pattern pictures. When I went to find the link on Amazon, I was surprised to find unfavorable reviews. Reading reviews by other readers, I decided that they might have been thrown by the title of this book. Crochet Master Class may give the idea that the authors are presenting very difficult patterns, or a course of study in advanced crochet. Instead I think the book might have been better titled, “Crochet by the Masters.”

    This book is a fascinating for many reasons. It presents 18 crochet techniques. Many of them are unusual or underrepresented among crocheters and designers. In all my years crocheting I’d never seen Crocheted Bruges Lace, for instance. The fact that it is relatively easy to create does not degrade from it’s beauty or intricacy. In fact, I think it’s the technique I’d like to try first from the book.

    The construction of the book is great. Each technique is presented by a “master.” The designer is profiled in a detailed biography. Then the technique is discussed in general terms, and pictures of items made using that technique are shown in a gallery. Finally, a pattern is presented for the reader using the technique. The patters are more of introductions to the techniques than the highest example of a particular technique. This makes perfect sense. If you’re showing something new, you want to make it accessible to everyone.

    I enjoyed reading about little-known techniques, and I also enjoyed hearing about and from crochet designers from around the world. Irish Crochet is presented by an Irish crocheter. There are designers from Germany, Russia, Trinidad, Australia, and of course, The United States.

    Oh, and I just discovered there’s a free pattern from the book for a double-ended crochet baby afghan on the Potter Craft web site.

  • New Year, No Resolutions

    change sign
    Creative Commons License photo credit: rockmixer

    I am not a habitual person. I’ll take medicine when I’m sick, but I’m terrible about remembering to take my vitamins. I exercise or do laundry as a way to get out of some other job (who knew procrastination could make one so productive). My workflow usually goes like this: wait until something really needs to get done, then work on it nonstop until it’s finished. I can be very focused that way.

    So, instead of making New Year’s resolutions and sweeping changes, I’ve decided to try and just do a few small things every day more regularly. I’m hoping to use the Internet less. I would like to knit a little during daylight hours instead of just at night. I’d like to do something habitual with my writing to make it less project/deadline focused, but I haven’t quite decided what that is.

    We’ll see how this goes. I’ll keep you posted. I can’t say I’m going to be blogging more because the way I think about blogging has changed a bit. I rely a lot more on Twitter now for little things like linking to interesting patterns, articles, etc. It’s my favorite quick publishing platform. I like to blog when I have something to say that I think is useful, fun or interesting. Not just because I haven’t posted in a while. I still love blogging and what I would like to do is talk more about technique and inspiration–the two things I find the most interesting with regard to my passions of fiber and food. I’d love to know what you think of that.

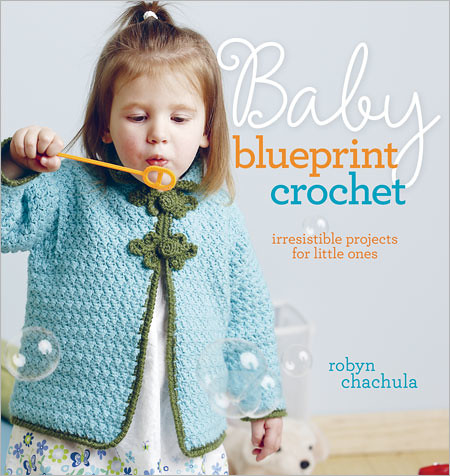
  • A New Book: Baby Blueprint Crochet

    Baby Blueprint Crochet Cover

    Oh, Robyn! I was so excited to finally see Baby Blueprint Crochet: Irresistible Projects for Little Ones, by Robyn Chachula. Robyn has been working as an engineer and a crochet designer for years, and she was able to show off her fabulous pattern techniques in her first book Blueprint Crochet. Now, she’s done it again, for babies!

    Yes, this book is totally adorable. We’d expect nothing less from Robyn, and from Interweave. But on top of being adorable, you also get to try out Robyn’s techniques of creating and joining motifs and constructing garments in a nice, small scale. You’ll learn a lot from this book and have fun doing it. Each pattern has charts and schematics to help you along, plus detailed written instructions–it’s like a hybrid of Japanese and American pattern styles. Very cool.

    My favorite garment in the book is the Stella Jacket. It’s also the one that’s on the cover. It’s an Asian inspired cardigan complete with crocheted frog closures. super-cute.

    Rosa Car Coat

    I also love the Rosa car coat, because it looks like a grown-up sized sweater smallified for wee ones. Very chic. Oh, and then there’s the Hunter Pullover–a raglan boy’s sweater with an awesome snowflake motif. There are Snuggly Socks and adorable Pea Pod Slippers, not to mention OMG cute popsicle boots!

    Popsicle Boots

    I will have to come up with a baby to make these for. All of the pieces have practical features only a designing-mom could think of like snap openings for the booties, and easy-on necklines on all the sweaters.

    One thing I would have liked to see in the garments section of the book are projects in finer yarns. Most of the garments are in worsted and DK yarns. This is great because you can finish projects quickly, but I think that baby items lend themselves to using fine yarns because you can create delicate fabrics without taking too much time. That said, the book uses a great variety of baby-friendly yarns in beautiful natural fibers, and vibrant colors.

    Robyn has been a good friend for years–we are almost always roomies at the Needle Arts trade shows. It’s possible I’m not utterly unbiased, but I do think that Blueprint Crochet is arguably the cutest book of baby projects I’ve seen in years. Brava, Robyn!

  • Gifts of Food: A recipe for Candied Pecans

    Candied Pecans

    I really wish December was two months long. Right now I’m on a break between semesters (which reminds me… I’ve got to go register for spring!). So I’ve been getting into the Christmas spirit, with Christmas crocheting and knitting and general crafty fun.

    Today, I dropped everything to make some treats. I have a couple of gifts that need to go in the mail, and they need to go out tomorrow to make it on time. So between dropping the kids off to school and lunch time I made seasoned pecans and candied pecans and rum balls. All three are family favorites.

    The candied pecans are so quick, they’re the kind of thing you can whip up while you’re waiting for something else to come out of the oven. They are also incredibly addictive.

    I didn’t have time to roll the chocolate into rum balls before I had to rush to the airport to pick up James. He’s been in Juneau all week. I should have called, because the plane didn’t get to land in Cordova. They were stopped by fog and had to continue on to Anchorage. I was glad I made the drive, though because the town is in the shadow of mountains, and even on a clear day doesn’t get direct sunlight in winter. Driving across the delta to the airport, I got to see beautiful frosty view and soak up some rays on this 14 degree day.

    I rushed back to town and went to a class Christmas party for Jay Jay, then took the kids and my fifth grade girl scouts over to the high school where the Honor’s Society was putting on Santa’s Workshop and kids get to make crafts to give as gifts. My favorite crafts this year were the very retro clove studded oranges and beeswax candles.

    So in case you need a quick treat to make for a party or for a gift, here’s my mom’s recipe for candied pecans.

    Candied Pecans
    (Makes 3 cups)

    1/2 c. sugar
    1 t. instant coffee
    2 T. water
    1/2 t. cinnamon
    1/8 t. salt
    3 c. shelled pecans.

    In a medium saucepan, bring to boil, sugar, instant coffee, water, cinnamon, and salt. Remove from heat, and add pecans, stirring for 3 minutes. Pour the sugared pecans onto parchment paper, and allow to cool (about 15 minutes). Store in a sealed, dry container.

    You can double or triple this recipe–just make sure to use a saucepan large enough to easily stir all the pecans. I just did a batch with 2 pounds (8 cups) of pecans and it came out beautifully.

  • Make a Parol: A Filipino Christmas Lantern

    DSC_0013

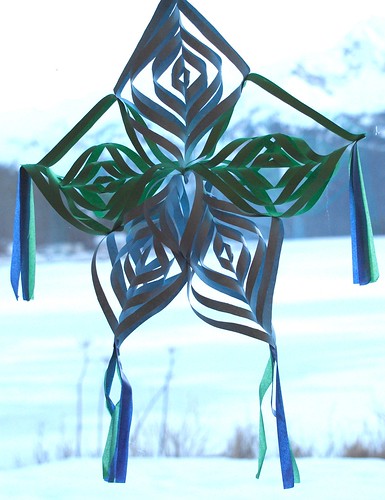
    Here in Cordova we have a vibrant Filipino community. We’ve all benefited by learning about the delicious food and a bit about music, and dancing from the Philipines. Last night, the Library hosted a craft night, and the featured craft was a Parol: a Filipino Christmas lantern. (The word parol comes from the Spanish word for lantern: farol.) Wikipedia says that in the Philippines, the parol is as much as symbol of Christmas as a tree is in the west. There are competitions to see which neighborhood can craft the best parols, and there is an infinite variety of designs.

    christmas lanterns

    Paula Payne, a librarian and local artist found a how-to video on You Tube, and learned to make a version of the parol that she could teach to the rest of us.

    P1030929

    I just watched the video, and found that it didn’t describe all the steps, so I’ll list them here:

    Step 1: Cut five sheets of paper into squares

    Step 2: Fold each sheet into a triangle, and into another triangle half the size.

    P1030930

    Step 3: Use a ruler to mark 8 even lines lengthwise across the triangles.

    Step 4: The triangle opens like a book. Cut along the lines towards the closed (fold) side of triangle. Stop cutting when there’s about 1 cm left.

    Step 5: Open your papers carefully and lay them flat.

    Step 6: With a small piece of tape, fold the corners of the center diamond in to make a tube and tape them shut. Then, do the same for every other diamond.

    P1030931

    Step 7: Flip the piece over, and fold and tape the remaining diamonds.

    Step 8: Take two of your star pieces and staple them together at the top corner. Then, staple again at what Paula calls the “shoulder,” which is the middle of the outermost diamond on each piece. Continue adding pieces this way until you’ve attached all five.

    Step 9: Use some scrap paper to make a hanger, and staple it onto one point.

    Step 10: Attach some tissue paper in strips to the remaining points, if you wish, to embellish your star.

    A note about size: the diameter of your star will be a bit more than twice the diameter of your squares, so size them accordingly. We made BIG stars last night, but today I’m trying one with origami paper. It looks cool because the two sizes of the paper are different. I’m sure once you learn the basic star you could come up with lots of variations.

    Parols weren’t the only craft last night. Another local artist, Carl Becker, was helping kids to learn origami. Jay Jay was captivated–as much by Carl’s calm, easy manner as by the paper folding–and came home with a gaggle of paper animals.

    P1030933

  • Starting to get crafty for the holidays: make a wreath from an old book

    Brrr! It’s chilly if you run outside without a coat, which is what I just did to snap a picture of the fog on the lake. The light is dim here all day right now, so the photo doesn’t do justice to how pretty it is.

    Fog on Lake Eyak

    I finished my school work for the semester and we’re getting into the holiday mood around here. Last night I went to my friend Erica’s house to make paper wreaths out of old books. It was quick and easy, and the results are pretty. You wouldn’t hang this wreath outside, but it looks nice indoors especially if, like Erica, you have a non-white accent wall. I don’t since we live in a rental house, so I hung mine on the back of the front door. I like the idea of text showing up in unexpected places. If you’re worried about destroying a book (gasp!) you can usually find one at a thrift store that already has a damaged spine or binding. (Or maybe you already have a broken book lying around your house).

    DSC_0001

    Erica found a tutorial for the wreath on a craft blog, but we didn’t end up using it, since the process is pretty self-explanatory: cut paper into leaves, hot glue onto foam wreath form, et voilà! I used pinking shears and tried not to be too orderly about it. The other ladies’ wreaths look a bit more symmetrical, but that’s not my style.

  • Wishing for Deathly Hallows

    Most of the time I don’t mind that there’s no movie theatre here in Cordova. Going to the movies is a fun part of any trip away from town. But sometimes I just want to be part of a cultural phenomon–like today, when the new Harry Potter movie opens.

    Jay Jay is currently obsessed with Harry Potter. Since he’s only five (he’ll be six on November 28th) he’s only been read the first two books in the series. I think they get a little too dark for a wee lad like him pretty quickly after Chamber of Secrets. But he insisted on being Harry for Halloween.

    Harry Potter

    I made the winter wizard cap with ear flaps and convinced Jay that if Harry were to come visit Alaska, he’d probably wear a hat.

    Now he wants to have a Harry Potter birthday party. This leads me to wonder–how do I make a Harry Potter party fun for kids who don’t know anything about the young wizard yet? Selma and I have come up with a few fun activities (a sorting hat game, a scavenger hunt for the Sorcerer’s Stone, making wands out of chop sticks, but I’m searching for more).

    Got any suggestions?

    p.s. In honor of the movie opening, Craftzine has posted a round-up of Harry Potter-themed crafts and they’re featuring my Hermione Tie with a picture of Selma.

  • Cinnamon-Crusted Pumpkin Seed Recipe

    P1030605

    On Wednesday night we had our annual pumpkin carving party. We’ve been hosting one each year since we moved away from Seattle where our friends Van and Tracy always had a great party. James has adopted Van’s recipe for Hot-Buttered Rum. This year, the party almost didn’t happen because we’ve had a shortage of pumpkins! Getting anything from the lower-48 to Alaska is a challenge, but big heavy fresh vegetables are probably one of the harder things to get here on time. We found a few on sale over the weekend for $1.00 per pound, but by Monday morning the town was fresh out and some folks we’d invited hadn’t gotten their pumpkins yet. Luckily most of our guests had planned ahead and were ready for Wednesday night.

    We transform my laundry (and yarn storage) room into carving central–there’s a formica table in there and concrete floors, so it’s a great place to make a big mess.

    P1030589

    I usually avoid the actual carving and sometimes convince James to carve a pumpkin of my own design. This year, I was too involved in salvaging and roasting the pumpkin seeds. With the help of many friends we liberated the seeds from the pulp of all the pumpkins being carved and set about roasting them. Once we started, we were full of ideas for various flavorings–wasabi, Italian seasoning, cocoa powder. But we settled on plain salted seeds and cinnamon sugar. The cinnamon sugared seeds were a big hit.

    P1030610

    To make them, rinse pumpkin seeds in a mesh strainer to get off any sticky pumpkin pulp. Shake off any excess water, then spread them on an oiled baking sheet in one even layer. Coat the seeds in a tablespoon or two of vegetable oil, then mix together 1/4 c. cinnamon, 1/4 cup sugar and 1 T sea salt (more or less depending on how many seeds you have). Coat the seeds with the spice mixture and bake at 400 degrees until everything is crispy. You can adjust the salt and sugar after cooking while the seeds are still hot and the additions should still stick to the seeds. Cool on a paper towel and store in a sealed dry container.

    One of the carvers took all the pulp and said he was going to make it into a pie like his grandmother always did. I’d only ever heard of using the flesh of the pumpkin, not the pulp–how about you? Have you ever made anything with pumpkin “guts?”

  • Of Halloweens Past

    img118

    Ms. Diane of CraftyPod tweeted the other day that her mom had blogged a picture of one of her childhood Halloween costumes. Of course this inspired me to ask my mom if she had any pictures lying around of me and my brother in old Halloween costumes. She found some.

    img117

    I’m not sure about my brother’s expression. Maybe he thought that Martians wouldn’t smile. I do love that the Martian space uniform says “Mars” on it. Of course! This must have been about 1982.

    What I remember about this costume is that wearing it made me completely bonkers. I was the bounciest court jester anyone had ever seen. I remember riding into town in the backseat of our little Dodge Colt and driving my mom crazy because I was so excited. It was the one year that we went to town to participate in the village Halloween parade. We lived about 2 miles from town and usually stayed up on the hill and trick-or-treated in our neighborhood where there were plenty of kids and houses. I bounced along through the parade, and then there was a review at the fire station where I won some kind of prize for my little costume. I doubt I needed any candy that year.

    What were your favorite Halloween costumes, did you have any pictures?

    Don’t forget, just a couple more days to enter my All Hallow’s Read Creepy Craft Book Giveaway.

  • All Hallow’s Read – Creepy Craft Book Giveaway

    Book witch
    Creative Commons License photo credit: mkhall

    Last week on Twitter, author Neil Gaiman mused that there should be more holidays for giving away books. And because of the way things work on Twitter and the Interwebs, now there is. It’s called All Hallow’s Read, and the idea is–you give a scary book to someone you know to spread the love and the spine-tingling.

    So, it turns out there are a number of spooky crafty books out there and I’ve got two of them to give away: The new Vampire Knits by Genevieve Miller and the classic, and truly weird, AntiCraft (Knitting Beading and Stitching for the Slightly Sinister) by Renée Rigdon and Zabet Stewart.

    To get one of the books, all you have to do is leave me a comment telling me one or more of your favorite scary books and who you’ll be giving a scary book to this Halloween.

    I will pick two winners at random on Halloween night. Good luck!